
This mode requires an Active Directory database. If you use Active Directory mode, you do not use your ReadyNAS system to manage your users and groups. Instead, you manage them with your Active Directory database and the changes are transferred to your ReadyNAS system every 12 hours.
To configure Active Directory mode:
1. Select Accounts > Authentication.
2. From the Access Type drop-down list, select Active Directory.
The Workgroup Name field changes to NetBIOS Domain Name and all fields become available.
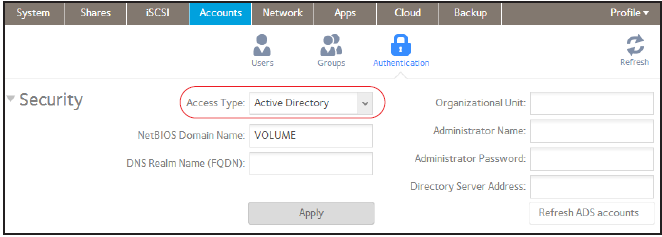
3. Configure the settings as explained in the following table:
|
Item |
Description |
|
NetBIOS Domain Name |
Enter the name of the NetBIOS domain, for example, company. Normally, the NetBIOS domain name is identical to the prefix of the DNS realm name.
|
|
DNS Realm Name (FQDN) |
Enter the DNS realm name, which is normally the DNS domain name or the Active Directory domain name, for example, company.community.com. In this example, company is the prefix, and community is the suffix of the name. |
|
Organizational Unit |
Specify the location of the computer account of the ReadyNAS in the Active Directory. By default, the computer account for the ReadyNAS is placed in the \users organizational unit (OU), but you can use the Organizational Unit field to specify another OU. You can specify OUs by separating OU entries with commas. Specify the lowest-level OU first.
|
|
Administrator Name |
Enter the name of the administrator of the Active Directory. |
|
Administrator Password |
Enter the password of the administrator of the Active Directory. |
|
Directory Server address |
Enter the IP address of the Active Directory server. |
4. Click the Apply button.
Your changes are saved.
5. (Optional) Click the Refresh ADS Accounts button.
User and group information on your ReadyNAS system is updated immediately.
For more information about managing users and groups with Active Directory, see your Active Directory documentation.
Keep the following precautions in mind when using Active Directory mode:
-
Your Active Directory server and your ReadyNAS system must have the same time set on their system clocks. NETGEAR recommends that you choose your domain controller as your NTP server to ensure that time settings are the same.
-
The DNS server that you use must be able to resolve the host name of the domain controller. NETGEAR recommends that you point your ReadyNAS to the Active Directory DNS to ensure that host names can be resolved.